
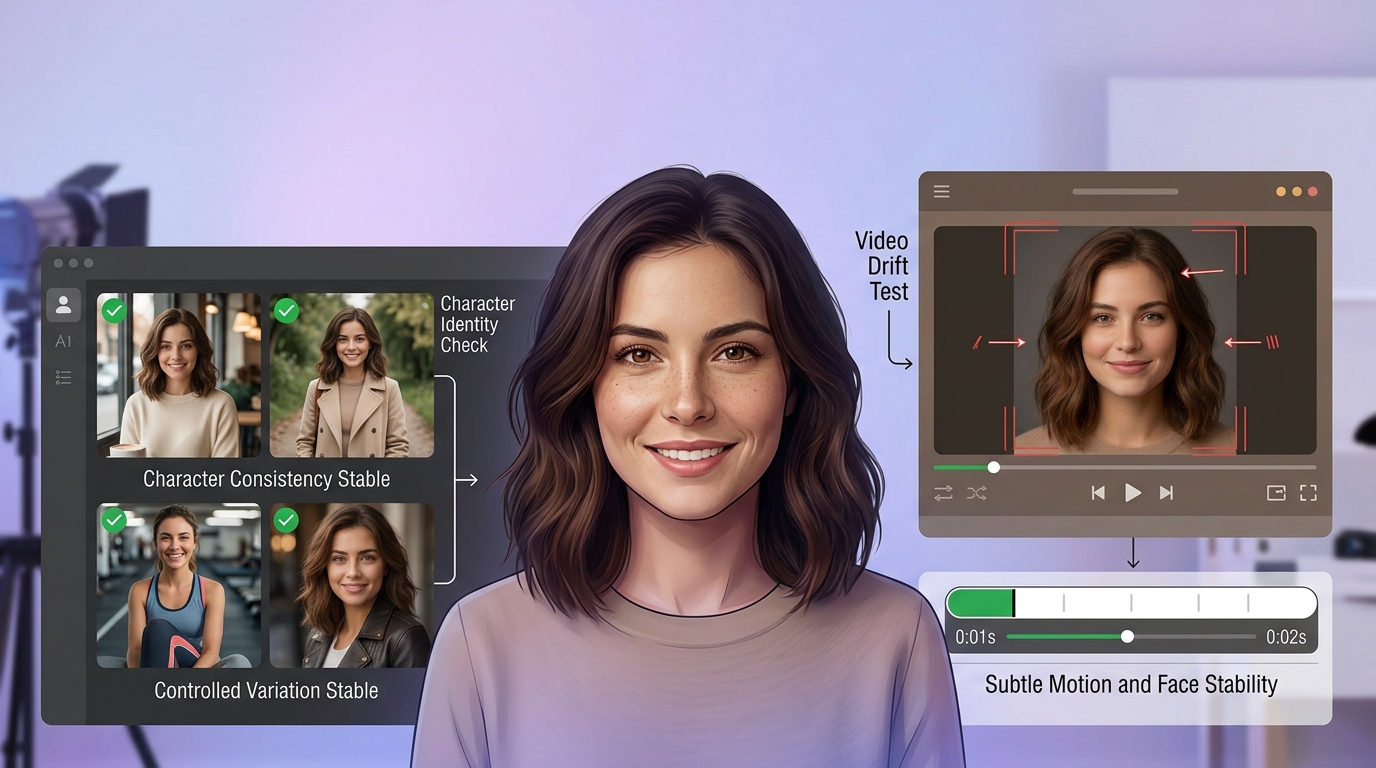
Wie man mit KI Fotos und Videos einer virtuellen Freundin erstellt
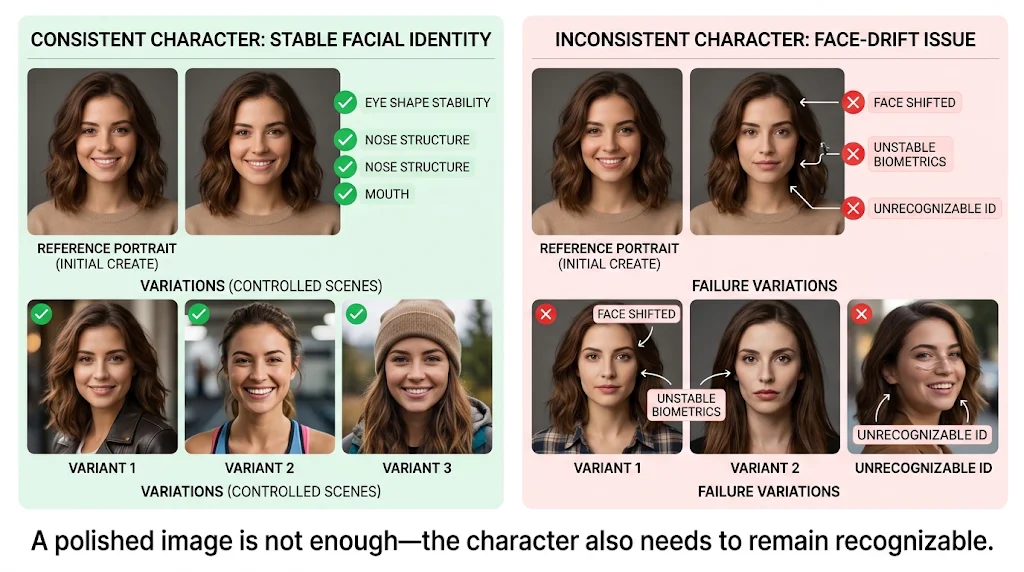
Creating one attractive AI girlfriend photo is surprisingly easy. Creating a second photo that still looks like the same woman is where the process often becomes frustrating.
The first portrait may look exactly right—the face, hairstyle, expression, and overall mood all work. Then you change the outfit or ask for a different camera angle, and the generator quietly replaces her with someone else.
Video makes those mistakes harder to ignore. A face that looks stable in the opening frame may begin to shift when the character smiles, turns her head, or walks toward the camera. Hair changes shape, eyes move, and a character you carefully designed can become unrecognizable within a few seconds.
The solution is not a longer prompt or a more expensive tool. The solution is to give the generator fewer decisions at each stage.
- The simplest workflow is: create the character, approve one reference portrait, generate controlled photo variations, and animate only the strongest image.
In this guide, I’ll show you how to follow that workflow without turning a creative project into a technical course. I’ll also point out which settings are worth your attention, which advanced options you can skip, and what to do when your virtual girlfriend starts looking like a different person.
Quick Answer: What Is the Easiest Workflow?
Start with a still image rather than asking a video model to invent the character and animate her at the same time.
A beginner-friendly process looks like this:
| Stage | What You Create | What to Check |
|---|---|---|
| Character design | One clear portrait | Face, hair, age, style |
| Photo variations | Four to six related images | Whether the same woman remains recognizable |
| Image-to-video | One short animated scene | Face stability and natural movement |
| Editing | One finished social or profile video | Pacing, cropping, audio, and disclosure |
The key is to approve each stage before moving to the next one. If the face already looks wrong in a still image, animation will not fix it.
For beginners, separating character design from animation reduces the number of variables the model must handle in a single generation.
What do you need before starting?
You need:
- An AI image generator;
- A reference-image or consistent-character feature;
- An image-to-video generator;
- A basic video editor;
- A clear idea of the character’s appearance.
You do not need custom model training, a complicated local setup, or six different subscriptions.
Guma AI combines image generation and animation in one interface, so you can create a character, select an approved reference image, and turn it into a video without switching between different tools.
How Do You Create a Consistent Character?
Character consistency begins before the first image is generated. You need to decide which features should remain recognizable when the outfit, setting, or pose changes.
You do not need to write a detailed fictional biography. Focus on visible identity:
- Adult age range;
- Face shape;
- Hair color and length;
- Eye color;
- Skin tone;
- General aesthetic;
- One recognizable detail.
That final detail can be useful as a visual anchor. Freckles, a short fringe, a beauty mark, a hair clip, or a distinctive necklace can make the character easier to compare across images.
Step 1: Define the character in plain language
A practical character definition could be:
- A fictional adult woman in her mid-20s with an oval face, warm brown eyes, shoulder-length dark brown hair, light freckles, and a calm, friendly expression.
This description gives the model recognizable features without burying the character under flattering but vague adjectives.
Avoid descriptions such as:
- Beautiful, perfect, gorgeous, stunning dream girlfriend.
Those words describe a preference, not an identity. The image generator still has to guess what “perfect” means, and that guess can change with every generation.
Should the character look realistic or illustrated?
Choose one visual direction before producing the reference portrait.
For a realistic virtual girlfriend, define:
- Natural skin texture;
- Camera framing;
- Lighting;
- Environment;
- Expression;
- Photography style.
For an anime or illustrated character, define:
- Illustration style;
- Line quality;
- Hair and eye design;
- Color palette;
- Clothing style;
- Background treatment.
Combining photorealistic portrait, anime eyes, 3D render, and cinematic photography in one prompt can create an inconsistent visual style. A hybrid style can still work, but the first approved image needs to establish that look clearly.
Step 2: Write the first photo prompt
A useful prompt answers five questions:
- Who is the character?
- What is she wearing?
- Where is she?
- What does the camera show?
- What lighting or visual style should the image use?
A simple formula is:
- Character identity + outfit + pose or action + setting + camera framing + lighting
Here is a realistic AI girlfriend prompt:
- A fictional adult woman in her mid-20s with an oval face, warm brown eyes, shoulder-length dark brown hair, and light freckles. She is wearing a cream sweater and sitting beside a café window, relaxed expression, medium close-up portrait, soft natural daylight, realistic photography.
For an anime-style character:
- A fictional adult anime woman with long black hair, green eyes, and a small silver star hair clip. She is wearing a casual blue cardigan and standing on a quiet city street at sunset, waist-up composition, soft detailed anime illustration, warm color palette.
Do not assume a longer prompt is automatically better. Once a prompt gives you the face and style you want, save it before making further changes.
- A strong character prompt defines recognizable features. A weak character prompt stacks attractive adjectives.
Step 3: Choose a useful reference portrait
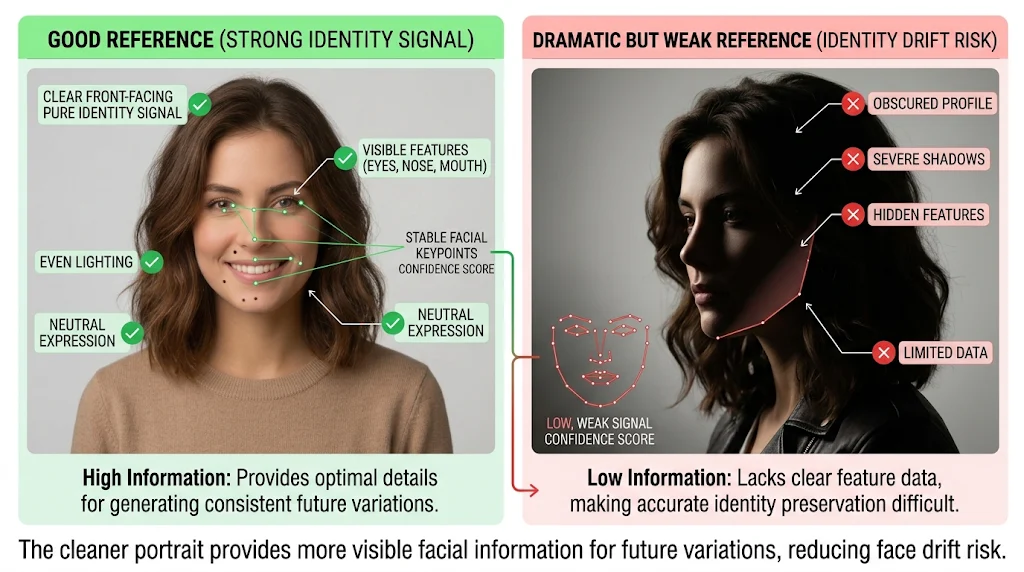
The prettiest image is not always the most useful reference.
A dramatic side profile with heavy shadows may look impressive, but the generator receives less information about the full face. A clean portrait may appear less cinematic while producing better character variations later.
Look for:
- A front-facing or slightly angled face;
- Natural or even lighting;
- A neutral or gentle expression;
- Clearly visible eyes;
- A clear hairstyle;
- Minimal image artifacts;
- No hands covering the face;
- No extreme beauty filter.
Runway’s current reference-image guidance also recommends a high-quality subject image with natural, even lighting and a neutral expression. The same documentation says its Gen-4 References feature can use up to three active references, although one clear portrait is enough for a beginner workflow.
I would not use a full-body image as the only facial reference. Full-body images can help with clothing and proportions, but the face may be too small to provide a strong identity signal.
If your tool accepts several references, a practical set is:
- One clear face portrait;
- One waist-up or three-quarter image;
- One optional outfit or style reference.
Start with one portrait. Add more references only when each image agrees on the face, hairstyle, apparent age, and visual style.
Step 4: Keep the same face across new photos
This is where a fun experiment can begin to feel like work.
You approve one portrait, change the clothes or background, and the next result comes back with a narrower face, different eyes, or a different apparent age.
The problem is not always that the prompt needs more detail. Text alone gives the model room to reinterpret the character.
Attach the approved portrait as the reference image. Keep the identity description stable, then change only one or two scene elements.
For example:
- Same fictional adult woman as the reference image, maintaining the same oval face, brown eyes, shoulder-length dark brown hair, and light freckles. She is wearing a black evening dress in a softly lit restaurant, medium close-up portrait, warm cinematic lighting.
For the next variation:
- Same fictional adult woman as the reference image, maintaining the same facial features, hairstyle, eye color, and light freckles. She is walking through a city park in a beige coat, natural overcast light, waist-up portrait.
A controlled sequence could be:
- Change the background;
- Change the outfit;
- Change the expression;
- Change the camera angle;
- Change the pose.
You can combine changes after the character remains stable through simpler variations.
If you change the hairstyle, outfit, pose, lighting, camera angle, expression, and location in one attempt, you will not know which instruction caused the face to drift.
- Consistent AI characters come from controlled variation, not increasingly complicated prompts.
How many starting images do you need?
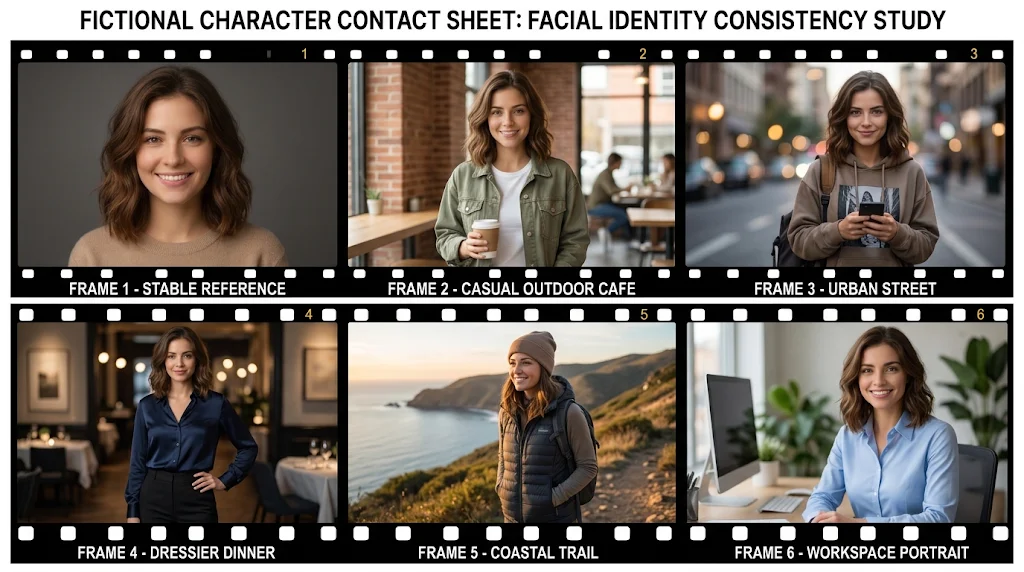
For a basic profile, image set, or short virtual girlfriend video, I would aim for six usable images:
- One main portrait;
- Two casual outfit images;
- One dressier image;
- One outdoor image;
- One seated or waist-up image.
Six related images are more useful than dozens of attractive but disconnected generations.
When later variations begin to drift, return to the original portrait. Using an imperfect variation as the next reference can gradually move the character further away from the original design.
How Do You Turn the Approved Photo Into a Video?
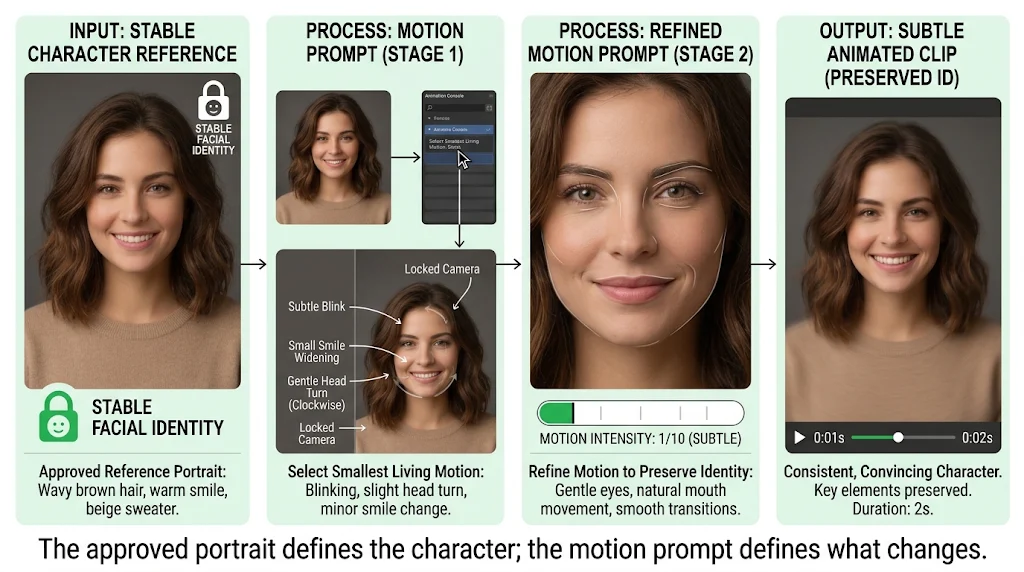
Once you have a clean portrait, animation becomes a smaller and more manageable task.
Choose an image without obvious defects. Pay particular attention to:
- Eyes;
- Teeth;
- Fingers;
- Earrings and accessories;
- Clothing edges;
- Reflections;
- Background objects.
Small defects in a still image can become much more distracting when they move.
Should you use image-to-video or text-to-video?
For this beginner workflow, I recommend image-to-video.
Text-to-video asks the model to create the woman, clothes, background, framing, and motion together. Image-to-video begins with an approved visual frame, so the character’s initial appearance has already been established.
| Method | Best Use | Main Tradeoff |
|---|---|---|
| Image-to-video | Animating an approved character | Motion may need to stay restrained |
| Text-to-video | Inventing a complete scene quickly | Character appearance may be less predictable |
| First-and-last-frame video | Guiding a planned transition | Requires more preparation |
| Talking avatar | Dialogue and lip-sync | May feel less cinematic |
| Real-time avatar | Interactive conversation | Serves a different purpose from a polished clip |
Google’s current Veo documentation describes support for character reference images and first-and-last-frame generation. Adobe Firefly also documents workflows that use an uploaded image as the first frame of a generated video. Availability can depend on the product interface, plan, model, and region, so confirm the current feature set before choosing a tool.
Image-to-video does not guarantee perfect identity consistency. The final result still depends on the model, the source image, and the amount of requested motion.
How do you write a motion prompt?
When the source image already defines the face, clothing, composition, and background, use the video prompt to describe movement.
A simple close-up prompt could be:
- The woman looks toward the camera, blinks naturally, smiles gently, and slightly tilts her head. Her hair moves softly in a light breeze. Locked camera.
For a café scene:
- The woman looks up from her coffee, makes brief eye contact with the camera, and smiles. Subtle breathing and small head movement. The camera remains still.
For a walking scene:
- The woman walks slowly toward the camera with relaxed natural movement. Her coat and hair move gently in the breeze. The camera smoothly tracks backward.
Runway’s current video prompting guide recommends beginning with simple physical movement, adding one prompt element at a time, and describing what should happen rather than relying on negative instructions. The guide uses positive camera language such as locked camera instead of no camera movement.
A practical motion prompt can include:
- Subject movement;
- Facial expression;
- Camera movement;
- Environmental movement;
- Overall pace.
Avoid asking for several complicated actions in a short scene.
A prompt such as:
- She stands up, walks across the room, turns around, picks up a bag, waves, laughs, and leaves.
creates many opportunities for the face, hands, body, and background to change.
Start with one visible action. Add a second action only after the simple version works.
How much motion should you request?
Less than your first instinct may suggest.
It is tempting to make the character walk, spin, speak, laugh, and move the camera at the same time. Each extra action gives the model another detail to resolve.
Begin with:
- Blinking;
- A small smile;
- Gentle breathing;
- A slight head turn;
- Minor hair movement;
- A slow camera push;
- A locked camera.
Subtle movement can feel less exciting in the prompt box, but a quiet scene that preserves the character is often more convincing than an ambitious scene with visible distortions.
How Do You Fix Face Drift and Other Video Problems?
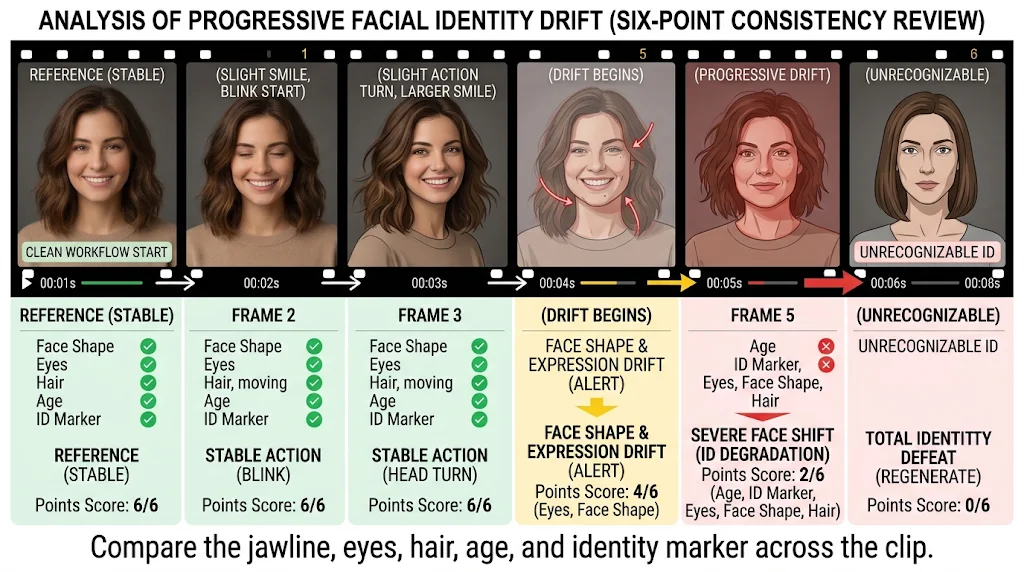
Face drift occurs when the character’s identity changes during the video.
The jawline may become wider, the eyes may shift, or the face may gradually resemble a different person. These errors often become more visible during strong expressions, large head turns, complicated body movement, or camera motion.
Use the following troubleshooting order before switching tools:
| Problem | Possible Cause | What to Try |
|---|---|---|
| Face changes halfway through | Motion is too complex | Reduce head and body movement |
| Eyes or mouth distort | Expression is too strong | Request a gentle smile or neutral expression |
| Face looks different immediately | Source image provides a weak identity signal | Use a clearer and closer portrait |
| Hair changes shape | Strong motion or changing light | Reduce motion and stabilize the camera |
| Background bends or moves | Too many scene instructions | Use one subject action and one camera action |
| Hands look unnatural | Hands are prominent in the source image | Crop tighter or choose another image |
| Clip looks stable but lifeless | Motion is too limited | Add one small action, such as blinking |
| Second half breaks down | The clean action finishes early | Trim the unstable ending |
Do not assume every generated second must be saved.
If the first three seconds look convincing and the final two seconds fall apart, trim the clip. Editing a clean section is often more efficient than trying to rescue a visibly unstable ending.
- A short, clean clip is more useful than a longer clip that loses the character.
How can you review character consistency?
You do not need to compare every pixel.
Check six visible traits:
- Face shape;
- Eyes;
- Eyebrows;
- Hairstyle;
- Apparent age;
- One recognizable identity marker.
If several traits change together, the image may still be attractive, but it probably does not belong in the same character set.
Optional: Use a six-point consistency score
If several people are reviewing the outputs, a simple scoring rubric can make decisions more consistent:
| Feature | Score |
|---|---|
| Face shape | 0-2 |
| Eyes and eyebrows | 0-1 |
| Hair | 0-1 |
| Apparent age | 0-1 |
| Identity marker | 0-1 |
| Total | 0-6 |
Within this editorial rubric:
- 5–6: Strong candidate;
- 3–4: Review carefully;
- 0–2: Likely regenerate.
This Character Consistency Score is an editorial review method created for this workflow. It is not an industry standard, scientific benchmark, or published model evaluation.
If you do not need a scoring system, ask a simpler question: would someone who has never seen these images immediately recognize the same fictional woman?
Which Tools and Features Actually Matter?
You do not need to choose the “most advanced” AI girlfriend generator. Choose a tool that supports the stage you are trying to complete.
For the basic workflow, look for:
- Text-to-image generation;
- Reference image upload;
- Image-to-image variations;
- Image-to-video generation;
- Regional editing or inpainting;
- Camera or motion controls;
- First-frame input;
- Clear export, storage, and deletion settings.
Runway currently documents single- and multi-reference image workflows, including support for up to three references. Veo currently documents character references and first-and-last-frame controls. Adobe Firefly documents using an image as the first video frame. These examples show the types of controls to look for; they are not a declaration that one platform is the best choice for every project.
Product features, plans, models, and credit costs change. Check the official product page before beginning a large batch.
Which features can beginners skip?
For a first project, you can skip:
- Custom LoRA training;
- ControlNet workflows;
- IP-Adapter configuration;
- Local diffusion checkpoints;
- CLIP and VAE settings;
- Complex ComfyUI graphs.
These options can provide more control, but they also add setup, testing, and troubleshooting.
I would move to an advanced workflow only when you can name the limitation you are trying to solve. For example:
- The face changes across dozens of scenes;
- The same pose must be reproduced precisely;
- A large character library needs repeatable generation;
- Regional corrections take too much manual work;
- A browser-based reference workflow cannot maintain the required identity.
Until then, stay with the shorter path:
- Reference portrait → controlled photo variations → approved image → short animation → edit
How do you compare generators without relying on marketing claims?
Do not compare one lucky generation from each tool.
Use the same inputs:
- Select one reference portrait.
- Write two photo prompts.
- Write two motion prompts.
- Generate the same number of outputs in each tool.
- Record credits, cost, and rejected results.
- Compare consistency and usable output.
A useful metric is:
- Usable clip rate = accepted clips ÷ total generated clips × 100
If two out of eight clips meet your criteria:
- 2 ÷ 8 × 100 = 25%
That percentage is an arithmetic example. It is not a measured success rate for any named generator.
You can also calculate:
- Effective cost per usable video = total generation cost ÷ accepted clips
A lower price per generation does not automatically mean a lower cost per finished video. The meaningful comparison is how much you spend to obtain an output you can actually use.
Record:
- Tool and model version;
- Test date;
- Reference image;
- Exact prompt;
- Number of generations;
- Credits or cost;
- Rejection reason;
- Consistency score;
- Accepted output count.
This process creates defensible first-party data. Until the comparison has been completed, do not claim that one tool is a certain percentage more consistent than another.
How Do You Edit and Publish the Final Video?
Do not try to generate an entire finished video in one prompt.
Create several short clips and keep only the clean sections:
- Opening close-up;
- Small smile or eye contact;
- Medium shot in another setting;
- Gentle walking or environmental movement;
- Final close-up or fade.
During editing:
- Trim unstable frames;
- Remove sudden identity changes;
- Match brightness and color;
- Use simple transitions;
- Add music after the visuals work;
- Crop for the final platform;
- Keep captions away from the face;
- Review the finished export, not only the timeline preview.
For vertical social content, plan around a 9:16 composition from the beginning. A horizontal portrait may not crop cleanly into a vertical frame.
What should you check before publishing?
The character may be fictional, but the publishing context still matters.
Before sharing the finished content:
- Use a clearly fictional adult character;
- Do not imitate a private individual without clear consent;
- Avoid celebrity likenesses unless you have a legitimate and permitted use;
- Check the tool’s current commercial-use terms;
- Review how uploaded reference images are stored and deleted;
- Do not present the fictional character as a real person;
- Disclose AI-generated media when viewers could reasonably be misled;
- Keep a record of source images, prompts, edits, tools, and model versions.
The NIST Generative AI Profile emphasizes documenting AI-system assumptions, limitations, data provenance, evaluation methods, and output review as part of responsible generative-AI use.
If your workflow supports C2PA Content Credentials, those credentials can provide tamper-evident provenance information about how an asset was created or modified. Content Credentials do not independently prove that the depicted scene or attached claim is true.
This is not the most exciting part of the process, but it becomes important when the character is published, monetized, or used as a public-facing identity.
Frequently Asked Questions
How do you make an AI girlfriend from scratch?
Define a fictional adult character, generate one clear reference portrait, and use that portrait to create controlled variations. Approve the still images before using an AI image-to-video generator to animate the character.
How do you keep the same face in every image?
Use one approved reference portrait, repeat the same identity details, and change only one or two visual elements at a time. Return to the original portrait when later variations begin to drift.
What should an AI girlfriend photo prompt include?
Include the character’s stable visual identity, outfit, pose or action, setting, camera framing, and lighting. Keep the identity description consistent while changing the surrounding scene.
Can one photo be turned into a virtual girlfriend video?
Yes. An AI image-to-video generator can use one portrait as the opening visual frame. Begin with small actions such as blinking, breathing, smiling, or gently turning the head.
Is image-to-video better than text-to-video?
Image-to-video is the better starting point for this workflow because the source image establishes the character’s initial appearance. Text-to-video may be more suitable when quickly inventing a new scene matters more than preserving a specific face.
Why does the face change during the video?
Face drift can be associated with weak reference images, strong expressions, large head turns, complicated body movement, changing light, camera motion, or prompts that request too many actions. Reduce motion complexity before replacing the source image or changing tools.
How do you fix face drift in an AI video?
Use a clearer portrait, reduce head and body movement, request a gentler expression, stabilize the camera, and trim unstable frames. Change one variable per attempt so you can identify which instruction affects the face.
Do you need ControlNet, IP-Adapter, or a LoRA?
Not for a first project. Begin with a normal reference-image workflow. Consider advanced conditioning or custom model training only when you need the same character across a large content library or require tighter control than the basic workflow can provide.
How many photos should you generate before making a video?
There is no universal number. For a small project, one main portrait and approximately five controlled variations provide enough material to check whether the character remains recognizable across outfits, settings, and poses.
What Is the Final Workflow?
The finished process is simple:
- Define a fictional adult character with recognizable features.
- Generate one clear reference portrait.
- Keep the identity description stable.
- Change one or two visual elements at a time.
- Approve the still image before adding motion.
- Use image-to-video for the first animation.
- Begin with small, visible movements.
- Trim unstable frames rather than forcing an entire clip to work.
- Save the prompts, references, settings, and model versions.
- Review consent, disclosure, commercial terms, and provenance before publishing.
The first portrait is the fun part. The next few images are the real test.
Once the same woman remains recognizable across different scenes—and survives a few seconds of animation—the project stops looking like a folder of unrelated AI images and starts feeling like one coherent virtual character.
Character identity first. Motion second. Document the process before making performance claims.